Saturday, September 25, 2010

UFO Completed! Spring Fairy Doll


I think this one is finished. I learned alot and think I will explore the design a bit more. I might even sculpt a skirt portion and make a mold , we shall see! I think having a theme and knowing what will go into the skirt space is important for the next version. I have some ideas here, but mostly they are too elaborate. It may be a good design to incorporate more fabric and embellishing methods too. This idea is used alot by doll makers, so think I should spend some time thinking about how to make it more reflective of my imagination.
I have one more gourd UFO (eg unfinished objects, the infamous boat lady) but its nice to see this one to completion.

Tuesday, September 07, 2010

Gourd Doll a Fairy ?


This piece has been a lot of fun. This weekend I started playing around with the niche and going through my treasures to see how I might embellish this... its been so much fun to play with my beads, vintage jewelry collection, and trims
The tiny gourd baby I created last night from some china painted miniatures I made several years ago. I sculpted the body from Apoxie sculpt, paper- mache'd the body, and touched up with a little antique gold inks. The baby is lying in a paper-mached egg gourd with a vintage brass dragon fly and moth . I think the larger figure needs more embellishments, and am still sorting through my treasures. This is the fun part!

Sunday, August 29, 2010

Playing With Heads Again


Hmmm, interesting weekend :) Instead of painting on the gourd doll as I intended, I got side tracked with sculpting with paper mache. If you refer to my post about creating molds for the Laura doll, I need to sculpt arms and legs for that doll. I decided I needed to make a prototype to figure out what size arms and legs would be appropriate. I had putty molds of the shrunken head, I though I could use them as press molds to get a head the correct size. As you may have expected, press molds are difficult to work with, and of course I ended up resculpting the face ..... but now I have something approximately the correct size to prototype a cloth body and make arms and legs. Other lessons learned, this validates the whole idea of refining the sculpt in wax from the putty molds. These papermache heads don't have nearly the detail that the wax sculpt has, and I am already tired of sanding the papermache! But it was an enjoyable weekend. Maybe I can discipline myself to paint next weekend. I wish all of you time to enjoy these last days of summer. Fall is right around the corner.

Tuesday, August 24, 2010

The Hobbiest's Nightmare Multi-Tasking or is it Multiple Personality Disorder

I am not sure if I will published this blog entry. Right now I am writing it as self-therapy and I doubt if this could be interesting to anyone but me. After all everyone does creative things for different reasons and my reasons are different from yours. But here it is. I MUST create stuff just like I MUST make music. I put it in same category as eating my vegetables, excercising and watching movies. These things make me feel better and enjoy life. I am not paid for any of these activities but that doesn't mean I won't do them.

The competing interest is my day job. I love my day job, spent years refining the skills I use there, and think society as a whole benefits from my efforts. Bottom line, I am not quiting my day job just because I like to sculpt, paint and play music. BUT how can one find the discipline to fit in all this stuff into a 24 hour day ? How can you stretch and grow as an artist (or musician) if you only have time to indulge once every two weeks ?

And here is the rub. I have always been a goal directed person, probably because I am really lazy. If I didn't have goals I would stay in bed all day with the remote control, laptop and phone nearby. But my artistic goals do not match a twice a month schedule and therefore I ended up feeling frustrated.

Sunday, August 22, 2010

More on the Gourd Doll


I woke up in a mood today. For those of you who are irritated with whining, you may wish to skip this paragraph. But needless to say there have been complications in my life that have made finishing art projects difficult. I had to unpack my studio for my daughter to move in, and the studio things have been moved around so often, I can't find anything anymore, and I don't have a place to work. But because I was in a mood (crabby), I wasn't going to let these things stop me. So I went to Joanns, purchased some replacement brushes and mod-podge and decided to dive into the gourd doll UFO (unfinished object).


So I pulled out all of the napkins and special papers I could find, and was happy I did stick to the rose napkin I had intended to use. I then decoupage the napkins to the dolls niche. I am a little nervous since I am not sure what I am going to put into the niche... have some ideas but they are still percolating.


I then laid out some basic colors into the figure with oils. I will need to buy a better lines brush to get the details, so this layer ended up just being the undercoat. I will detail next time I am in the pissy mood :)

Saturday, August 21, 2010

New Materials and Molding Techniques


New Materials And Molding Techniques by Kristen Strand-Tibbitts

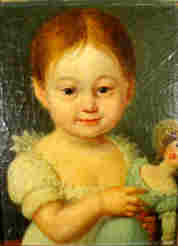
The picture on the left is the original 30 inch prototype Laura doll. The picture on the right is the Hydroshrink cast of face portion of Laura from the waste mold
The picture on the left is the Hydroshrink heads after dehydrating and shrinking for 6 days. The picture on the right is one half of the mold created from Compsimold-LT
This article is not exactly related to Softies, nor cats and dogs. Although I would argue you could use some of these molding techniques to create molded felt animals like R.John Right!

I attended a private class at Gail Wilson’s workshop in Acworth New Hampshire this spring, where my goal was to learn how to shrink a sculpt, create molds, and refine a doll design. The doll in the above picture was sculpted in earthenware clay, and a plaster waste mold was produced. I poured the head in liquid papermache (FLUMO) , added sculpted hair, and painted her in oils. I always like this doll, and call her Laura. She is about 30 inches tall but not my idea of the ideal doll because she is too large. Also since I was focused on making a pretty face, I did not have any plan on how to attach her head or create a body. I was interested in learning how to shrink down a sculpt, and refine some of my mold making skills and get an overall doll design, for the new and improved Laura doll. We agreed to break this into several sessions, with the first step shrinking down the doll to be about a 15-16 inch doll.

The initial plan of action was very traditional. We could make a putty mold of the Laura doll head, and pour the head in wax. This two part putty mold is a quick and easy method to make molds from originals. It’s a flexible material so its other advantage is you can unmold something with undercuts like Laura’s hair I purchased the putty from http://www.alumlite.com/ . This strategy would be to use the putty mold to cast a wax head, while solidifying, it would shrink a bit, and then one would create another waste mold in plaster and then repeat the process. Gail calculated we would need to do this 5 times to get a doll of about 15-16 inches. However polymer chemistry save the day, and Gail identified a new product called Hydroshrink (http://www.sculpt.com/) which when poured into a mold, the item will shrink 51%. This implied we could do the shrinking in one step!

I had a plaster waste mold of the original doll, which we could cast in Hydroshrink, but I also had a porcelain head that I poured and fired from the original waste mold so this head was 16 % smaller than the original. We decided we would try both, so as to increase the odds of getting a head the size we wanted.

We needed to make a mold of the porcelain head, and here again Gail found another miracle material. We used a product called ComposiMold-LT (http://www.compositherm.com/) which is a hard gel like substance that you can melt on the stove or microwave, and in its hot , liquid state use it like plaster to make molds. The advantage of this material is it is easy to use, and can re-use this to make additional molds. I just cut it up , re-melt, and reuse. So this composi-mold when cooled was used to cast another Laura in Hydroshrink. As it dehydrates and shrinks, it becomes a transparent yellow-ish color. The second photo shows the Laura faces after a week of dehydration and shrinking. According to the website, dehydration/shrinking can take up to 14 days.

So early this summer, my heads have shrunken, and I made putty molds with a product you find here: http://www.alumilite.com/ProdDetail.cfm?Category=Silicone%20Rubber&Name=Mold%20Putty. This stuff is pretty good for a starting point to impove a figure, but you wouldnt want to use to cast doll parts. I poured the putty molds with Medium Firm sculpting wax purchased at Willow Products, attached each side by slightly melting the wax with an embosing gun, and pressing together . There were a few rough edges to smooth, but all in all it looks good. The last images shows wax doll with sculpted in using a softer was (Ether) sold at Willow Products (http://www.willowproducts.com/) .


Currently I am trying to figure out what size arms and legs go with this head. I will try to keep you poseted